
Genesis Server installation procedure
Applicable for Release 1.1.0
To install Genesis
Server properly you have to execute the following steps on the sever:
![]() Install Java Runtime Environment Standard Edition if necessary
Install Java Runtime Environment Standard Edition if necessary
![]() Download Genesis Server and unpack it in a directory
Download Genesis Server and unpack it in a directory
![]() Configure the server and database
Configure the server and database
![]() Start and test the application server
Start and test the application server
![]() Install the Genesis Server Client
Install the Genesis Server Client
![]() Create an Administrator Account
Create an Administrator Account
![]() If necessary setup your firewall if necessary
If necessary setup your firewall if necessary
Java
Runtime Environment installation
![]() Open a shell
Open a shell
![]() Check the current Java version with the command:
Check the current Java version with the command:
 java -version
If you get an error or the
java version is not 1.3.1 or later, install a new
Java Runtime Environment, else proceed
with "Donwload Genesis Server".
Genesis Server is able to run on Java version
1.3.1, but 1.4.1 is recommended.
![]() Download the Java Runtime Environment (JRE)
Download the Java Runtime Environment (JRE)
|
Recommended
is Java Runtime Environment (JRE) Release: 1.4.1_02
(Windows,
Linux, Solaris) |
Download |
|
If you are using an other platform see: Java
Platform Ports |
![]() Install it according to the Installation
Instructions
Install it according to the Installation
Instructions
For further information about Java click here.
Download Genesis Server
![]() Download or install the Genesis Server form the installation
section.
Download or install the Genesis Server form the installation
section.
![]() Unzip the Genesis Server zip file. The cross-platform way to do this is
to,
Unzip the Genesis Server zip file. The cross-platform way to do this is
to,
in the command shell,
issue the command
jar xvf <genesis-zip-file>
where
<genesis-zip-file> should be replaced by the name of your downloaded
archive. If you have
not set the path ot the proper JavaVM, add the path in front of the
jar
command to the right Java-VM directory, for instace:
/usr/java/bin/jar
xvf ...
![]() A JBoss directory hase been created which contains the
Genesis Server. All path
A JBoss directory hase been created which contains the
Genesis Server. All path
statements from here
on are relative to the JBoss
directory.
Server configuration
![]() Open the file run.sh
(or run.bat
for windows systems) in the bin/
directory
Open the file run.sh
(or run.bat
for windows systems) in the bin/
directory
![]() Specify the path to the right JavaVM for the JAVA_HOME environmental variable,
e.g.
Specify the path to the right JavaVM for the JAVA_HOME environmental variable,
e.g.
#
---------------------------------------------------------------------
# Genesis Server Settings
# ---------------------------------------------------------------------
JAVA_HOME=/usr/local/java/j2sdk1.4.1_02
export JAVA_HOME
# --------------------------------------------------------------------
# End Genesis Server
Settings
# --------------------------------------------------------------------
![]() To change the memory
given to JBoss edit in the bin/run.sh (or run.bat) file the
To change the memory
given to JBoss edit in the bin/run.sh (or run.bat) file the
command –mxXXXm
(where XXX is the number of MBytes given to the VM, e.g.
1024 for 1 GByte) in
the last line:
# --------------------------------------------------------------------
# Genesis Server Settings
#
# --------------------------------------------------------------------
JAVA_OPTS="$JAVA_OPTS -mx1024m
# If a 64-Bit Java VM is available:
# JAVA_OPTS= -d64 "$JAVA_OPTS
# --------------------------------------------------------------------
# End Genesis Server
Settings #
# --------------------------------------------------------------------
![]() If you have a 64-Bit
Java VM remove the comment tag in front of the -d64
tag:
If you have a 64-Bit
Java VM remove the comment tag in front of the -d64
tag:
# --------------------------------------------------------------------
# Genesis Server Settings
#
# --------------------------------------------------------------------
JAVA_OPTS="$JAVA_OPTS -mx1024m
# If a 64-Bit Java VM is available:
JAVA_OPTS= -d64 "$JAVA_OPTS
# --------------------------------------------------------------------
# End Genesis Server
Settings #
# --------------------------------------------------------------------
Setting server ports
If you already have a JBoss server running on your server, you need to change the following ports to any freely available port. If the standard setting is Ok for your environment you can skip this step: The default ports are:
| Service |
Port |
File |
| Genesis
Server Communication Port ( = JBoss-Tomcat Web Server Port) |
8080 |
server/default/deploy/tomcat41-service.xml |
WebService |
8083 |
server/default/conf/jboss-service.xml |
| JBoss
Port |
1099 |
server/default/conf/jboss-service.xml |
JRMP
Invoker |
4444 |
server/default/conf/jboss-service.xml |
OIL
Server |
8090 |
server/default/deploy/jbossmq-service.xml |
UIL
Server |
8091 |
server/default/deploy/jbossmq-service.xml |
HypersonicDatabase |
1476 |
server/default/deploy/hsqldb-service.xml |
AJP Connector
If you intend to access the Genesis Server via an Apache web server you need to enable the AJP 1.3 connector in the server/default/deploy/tomcat41-service.xml file. This enables the tunneling of the genesis client - server communication through a firewall (using port 80 of the apache server). If you do not need this, skip this steps.
![]() Enable the mod_jk module of apache (see apache documentation)
Enable the mod_jk module of apache (see apache documentation)
![]() Open the mod_jk.conf
file
Open the mod_jk.conf
file
![]() Add a JkMount, e.g.:
Add a JkMount, e.g.:
#
# Genesis Tomcat extension
for all servers with own jk-worker
#
JkMount /axis/services
genesis
JkMount /axis/services/*
genesis
![]() Open the mod_jk_workers.conf
file
Open the mod_jk_workers.conf
file
![]() Add genesis to the worker.list, e.g.:
Add genesis to the worker.list, e.g.:
#
# The workers that your
plugins should create and work with
#
worker.list=ajp12, ajp13,
genesis, keygen
![]() Add a genesis ajp 13 worker, e.g.:
Add a genesis ajp 13 worker, e.g.:
#
# ------ Additional ajp13
WORKERS for multiple tomcat support
#
worker.genesis.port=14009
worker.genesis.host=localhost
worker.genesis.type=ajp13
![]() Be sure the AJP connector of apache is working properly
Be sure the AJP connector of apache is working properly
![]() Open the file tomcat41-service.xml
file in the server/default/deploy/
directory
Open the file tomcat41-service.xml
file in the server/default/deploy/
directory
![]() Remove the comment characters before and after the AJP13
tag.
Remove the comment characters before and after the AJP13
tag.
![]() Change the port of your AJP connection to apache
Change the port of your AJP connection to apache
Starting the server
Compaq Alpha systems:If you have a FastVM installed it is necessary to change the stack limit by typing:
limit stack 32768
proceed with the unix
steps:
Unix systems:
chmod u+x run.shWindows systems:
![]() Start JBoss using the batch file run.bat
Start JBoss using the batch file run.bat
Install the Genesis Server Client
![]() Go tho the Genesis
Server Client installation area and install Genesis Server Client
Go tho the Genesis
Server Client installation area and install Genesis Server Client
on your computer (not
necessaraly the server).
Create
an Administrator Account
![]() Start the Genesis Server Client
Start the Genesis Server Client
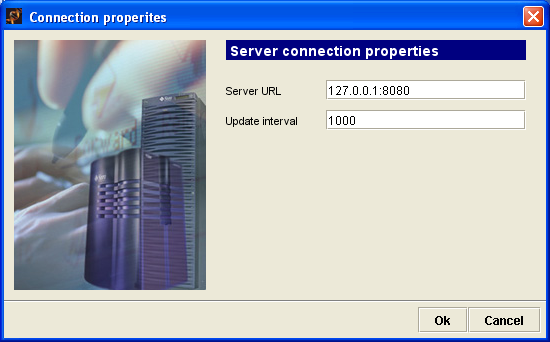
![]() Specify the server IP-Adress or server URL followed by the port in the
Server Connection Properties
Specify the server IP-Adress or server URL followed by the port in the
Server Connection Properties
Dialog (Settings->Server Connection...). Replace 127.0.0.1:
with the Server IP Adress or server URL
(e.g. servername.institution.org). If you
have changed the server port to any other than 8080 enter
your port here. If you have
installed the AJP 1.3 connector and apache is configured to run
on port 80
you do not need to
specify a port. Just enter the server IP-Address or URL
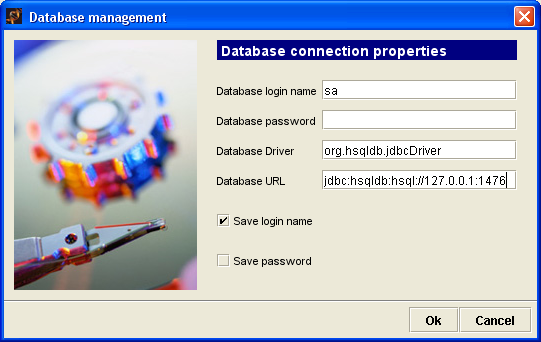
![]() Specify the server IP-Adress or URL in the Database Connection
Properties Dialog
Specify the server IP-Adress or URL in the Database Connection
Properties Dialog
(Settings->Database Connection...).
Replace 127.0.0.1 with the Server IP-Adress or URL.
If
you have changed the Hypersonic Database port, change 1476 to your Hypersonic
database port.
Do not change the rest!
![]() Connect to the server with the Connect button and enter
the data for the administrator account.
Connect to the server with the Connect button and enter
the data for the administrator account.
Leave the last
4 entries (2 lines) emtpy (number of jobs and max number of
jobs...).
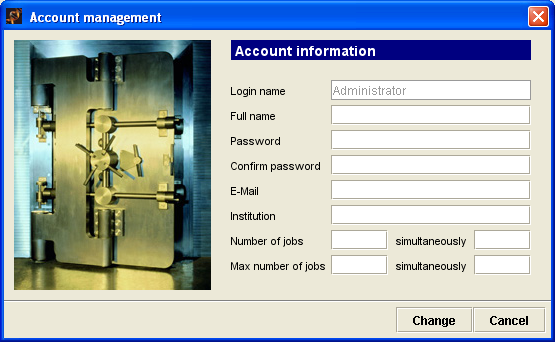
![]() Now you can use the Genesis Server and you may create
new user accounts.
Now you can use the Genesis Server and you may create
new user accounts.
Do not use the Administrator account for
calculation!
Firewall
settings
Genesis Server 1.1.0 uses SOAP for communication between the client and the server. Only the Genesis Server port has to be opened (e.g. port 8080). However, if you are using the AJP 1.3 connector in combination with an apache server you can tunnel this communition through port 80 and do not need to open the Genesis Server port. This is a major improvement compared to release 1.0.0!
© 2002 - Webmaster Alexander Sturn - alexander.sturn@tugraz.at